
Getting stuck raising an invoice on Xero? Want to know if you can save time by creating recurring invoices for monthly client projects?
Never fear, today on the blog we are going to guide you through the Xero invoice process step by step!

When should I raise a Xero invoice?
The moment that you have a client proposal accepted, or verbal/written contract from a client it is the right time to raise a Xero invoice. From an accounting point of view this allows you to achieve two things; firstly a solid base of paperwork from which to carry out your work and secondly a timely invoice despatch system when the job is finished.
Pre-planning your accounting alongside your project work, might feel like just one more thing to do, but honestly it helps, especially if you need to add in cost breakdowns to the invoice as you work those more complicated projects. It can also be used to track your income projections, which as a business owner is an incredibly useful financial tool.
Xero also has options for recurring invoices too, which means if you have a month to month contract with a client you raise the initial invoice and monthly invoices are generated automatically by the system for you at preset intervals… meaning all you need to do is monitor and reconcile payments.
This is just one of the reasons why we love using Xero with our accounting clients - it is the system that helps you make huge efficiency gains and manage your business finances with ease, regardless of how small or big your team is.
Let us show you how to get started.
How to create an invoice easily in Xero
There are several ways you can create a Xero invoice and in our video we are going to show you exactly how to do that.
Let us break those options again for you.
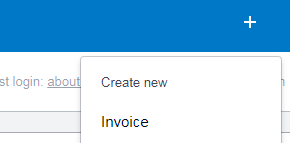
#1 Raising an invoice via your dashboard
For most of us when it comes to entering invoices we may batch the process, or have a dedicated member of staff to do this. If this is the case Xero has made invoice creation very easy. Using the ‘+’ sign at the top right of your dashboard menu (the blue bar) you will see a drop down menu that allows you to create a new invoice.
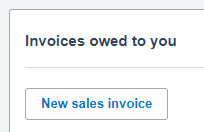
You can also use the ‘New Sales Invoice’ button under ‘Invoices Owed To You’ on the dashboard, which can be a handy workaround.
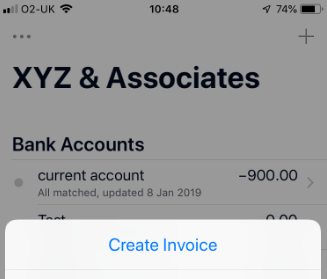
#2 Raising an invoice via your mobile device
Many of us work remotely, or on the go and having a mobile version of your accounting system in your pocket is an incredibly handy thing to have. You can raise your invoice directly from your mobile dashboard, using the ‘+’ icon on the top right of your mobile app.
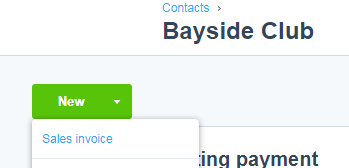
#3 Raising an invoice via a contact record
There will be times when you will need to set up a new client on your Xero system. Directly from this new contact record, or indeed any existing contact record you can create a new sales invoice by selecting the relevant button on the drop down menu that appears in the record details.
How to complete your Xero invoice using ‘Classic Invoicing’
One you have your new invoice open, you will want to fill it in with as much detail as possible. Here is how to do that. Please note here that the advice below is from the desktop version and mobile versions may differ slightly in layout… watch the video above for a full tutorial.
- Contact details - In the ‘To’ field, start typing your contacts details. If the client is an existing client the system will pre-determine options you can select from. Click on the contact name you wish to use. Xero will then automatically draw through the rest of the full contact details you have on record to this new invoice and link the invoice to the client for you, so that the invoice shows up under client records.
- Invoice date - The system preselects the days date for ‘invoice date’, but you can press the drop down arrow and change this if you wish.
- Due date - You can then follow the same instructions for your ‘due date’. The clever thing that the Xero invoice system allows you to do here, is to also use a ‘+number’ functionality, creating a date based on predetermined intervals. So, let us say you decided there will be times where your invoices need to be paid in 7, 15, or 30 days, then you can type ‘+7’, ‘+15’, or ‘+30’ and Xero will work out the relevant due date for you.
- Invoice number - Invoice numbers will automatically count upwards sequentially, which can be modified if your invoice requires a more specific numbering system. Your next invoice will raise with a number moving up by one from the original internal preset system.
- Invoice reference - You can then add a reference. Best practice is to make sure iot is something that is easily identifiable to your client. In most cases this could be a purchase order number, or a client job number for example.
- Branding - this refers to any preset invoice templates you may have set up. Most companies may have one style, but if you are an umbrella company with subsidiary revenue streams you may wish to design templates relevant to individual sectors of your business.
- Adding a file - You can also add files to your invoice if this is relevant, using the button next to ‘preview’. These could be files in yoru Xero system, such as terms of business, or from your computer, such as project overviews.
- Tax - just above the item lines is a box next to the prompt ‘Amounts are’. This is where you need to decide if your invoice is inclusive, or exclusive of tax, or no tax at all..
- Item lines - Scroll down to the product/service details of your invoice and click ‘Add an item / description’. In this row of data you will be able to add further details, such as a description, a unit quantity and price. You can also select relevant tax rates here too. If you have pre-populated product or service offerings in your system, this can be as easy as selecting the line you wish to add. If you need to edit this entry later on hover your mouse over a line item and click the item menu
to add a discount, edit an inventory item, or remove the line from the invoice. You can also drag and drop items to reorder the invoice details if you need to.
- Note on line discounts - make sure that if you are offering your client a discount that you are clear in your invoice if it is on a single item (then add the discount to your line), or to your total invoice (then add the discount to each line).
- Note on line ‘account’ - This refers to your revenue account, in other words which area of your business this sale is to be accounted for.
- Notes on line ‘region’ - This refers to Tracking Categories which can be set up in Xero and act like department references. Your business can use these to track specific income.
- Adding a message - this can be added easily under the description column, on a new row.
“A revenue Account is a pot of money where you can record your income. All bookkeeping systems use what they call a chart of accounts (COA) to break down what you want to record in terms of money coming in and money going out. Revenue Accounts are a set of accounts to record money coming in. These typically include accounts with names like SALES or INTEREST INCOME or OTHER REVENUE.
It is also perfectly feasible for users to set up their own revenue accounts to suit the needs of their business.
As for Tracking Categories, these are optional fields which can be set up to add additional reporting capability. They work a bit like department references and sit alongside the COA as a method of breaking down sales and purchases. Xero allows you to set up to 2 tracking categories and these can be based on anything you like. So it could be a list of sales personal or a list of Regions/territories etc, it's entirely up to the individual business what they feel they need to track.”
David Oliver, Senior Consultant at Valued.
Adding the invoice to a project? Sometimes there will be projects that we run with clients where there may be multiple invoices to raise and pay along the project’s life. You can link these together on your open Xero invoice, by selecting the ‘assign item to project’ link next to the ‘add new line’ button.
When you have finished creating your invoice, you can choose to save as a draft, or approve it. Remember you can go back to the invoice at any time before a partial, or complete payment is made to either: edit, send, get a link, or print the PDF.
As your screen refreshes you will see the invoice preview in view. From here you have several options;- ‘Send’ – which emails a copy of the invoice to your client
- ‘Get link’ – To copy a link of the online invoice which you can paste in a personal email to your client
- ‘Print PDF’ – To create a PDF copy of the invoice which you can attach by email to a client. Make sure to mark this as sent for your records.
The invoice's status will automatically update on the system to draft (which means it has not been sent), awaiting payment (meaning it has been sent), or paid (meaning it has been reconciled), depending on the process stage.
David’s Top Tip - avoid attaching PDFs for this very simple reason
If our client opens the PDF version of the invoice, then we have no way of tracking that using our Xero system. So instead make sure that you email the invoice to your clients and deselect the ‘include PDF’ option. This will force your client to view the invoice via an online link (perfectly safe), which then gets tracked in your accounting system as an item under the invoice history.